Thursday, July 31, 2014

Comfort in a cup

Maybe it is just me, but macaroni and cheese the best comfort food. I also really like the trend in food (and Pinterest) to make small portion things to eat. Thus, I decided to make single serving Mac and Cheese Cups. I found a very good recipe here. I selected it mainly because, it had broccoli in it which makes it healthy.....right?

Mac and Cheese Broccoli Cups

Ingredients
8 ounces (2 cups) elbow pasta
2 cups shredded mozzarella cheese
2 large eggs
1 cup 1% milk
¼ cup cream cheese
1 ½ cups broccoli florets, cooked and chopped
3 tablespoons chopped onion
1 tablespoon Dijon mustard
½ teaspoon sea salt
1 teaspoon black pepper
1 teaspoon italian seasoning
1 teaspoon garlic powder
Topping
2 tablespoons unsalted butter, melted
1 cup Japanese panko bread crumbs
2 tablespoons parmesan cheese, grated
Instructions
Preheat oven to 375 degrees F.
Cook macaroni according to package instructions in a salted pot of boiling water, undercooking slightly (al dente),
Drain the pasta and in a large bowl with cream cheese and mozzarella cheese stir until cheese is gooey and melted.
Crack the two eggs into a separate bowl, scrambling them slightly, then adding it to the pasta cheese mixture. Add the milk and stir.
Add seasoning of salt, pepper, garlic powder and onion and italian seasoning and continue to mix.
Add Dijon mustard and broccoli.
Divide the mixture among 15 cups of a greased muffin tin (I used one 12 and 3 from the other tin). Stuff into the cups, about ¼ cup each.
Topping
In a small bowl, stir together butter, bread crumbs and parmesan cheese. Don't clump but instead mix until it is like lumpy sand. Sprinkle evenly over the macaroni. Divide bread crumb mixture among macaroni cups, pressing into the cups.

Cook for 20 minutes. Allow to cool for 5 minutes and remove from tins. Enjoy! Let cool for at least five minutes before unmolding.


These turned out very yummy! I made a few changes to the recipe: I used crush pita chips for the panko and I used 1 cup Cheddar and 1 cup Mozzarella. The original recipe called for cream cheese and all mozzarella.

There was a unanimous agreement that it needed more creaminess. So I should have used the cream cheese. The only reason I didn't was because I totally forgot it and didn't want to go to the store for just that. We also agreed that it could use a bit of Serrano to jazz it up a bit or maybe just some slice tomato. Lots of experimentation to come.


Until the next party food...


Wednesday, July 30, 2014

Next time you want to stab me in the back...

An example of how a craft idea starts and ends for me:


So I saw this little guy on the great website: Think Geek

 Loved it and the realized: ooooh! I have a green cargo messanger bag already!


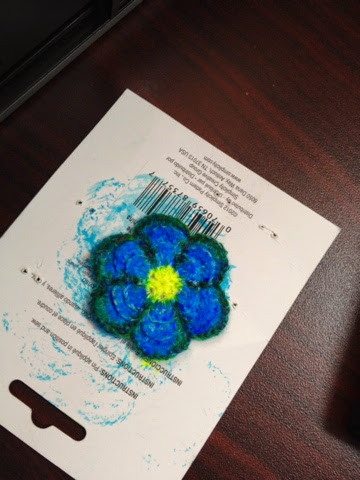
I still had a extra crocheted flower I used for my Cosplay of Kaylee, so I dolled it up.

Ta dah!

I bought the bear patch at Wondercon in April and got another heart patch at Joann's

The highlighter claimed it's territory. Le sigh.

I am very happy with the way this turned out and I have been using that that I haven't used since college much more. 

Hooray for upcycling! 

Until the next craft...


**Today's title is from Firefly: Mal: "Next time you want to stab me in the back, have the guts to do it to my face."**

Tuesday, July 29, 2014

How to Make a Cosplay: Hiccup

As you all know, I enjoyed Comic-Con 2014 this past month. I wanted to give y'all an idea of what it took to take an idea from spark in my mind to reality.

An Example


First off: I cut my hair for Wigs for Kids in late March and ended up loving it. After a couple days, I suddenly realized that most of my cosplays were created around what I could do with my long brown hair. "Uh, Oh" I thought... I figured that my hair would grow out enough for Captain Jackie Harkness and Roxy Richter has a wig. I figured I could do lady Mario again, but I wanted to pull out something new this year. So I brainstormed and though of Hiccup from How to Train Your Dragon (thanks to best friend whose favorite movie is said film). 

This is the picture I used for inspiration/a guide.
First off, I started hitting the thrift stores. I found a long sleeved, olive tunicish shirt for $6 (50% off day so $3). On another trip, I found boots for $9 (40% off so let's say $5). Unfortunately, the boots are size 8s. I wear size 6s at most normally. So an insert or two, plus an extra pair of socks were needed to wear them. I then hit up Joann's and got the fur for $14 (30% off so $10), lining for $4, and light brown felt for $3. Then came the hard part...construction: 

Using tissue paper, I created the vest pattern.
Using chalk, I outlined the vest on the pricey fur fabric.

I had a sash belt which I attached the felt to in order to make the belt.

The boot cuff was sewn to the sock to keep it in place while walking the Convention floor.
I used olive oil to dye the boots a different color (there was a stain on right toe that needed covering up).

COST

Shirt - $3
Pants - Already owned
Boots - $5
Felt - $3
Fur - $10
Lining - $4

TIME

Shirt (30 minutes)
Hemming slits cut- 20 minutes
Adding strings - 10 minutes

Pants (10 minutes)
Adding lace up detail to side - 10 minutes

Vest (3 hours)
Perfecting Pattern - 45 minutes
Cutting and basting lining for initial example- 30 minutes
Cutting and pinning fur to lining - 30 minutes
Sewing Vest together - 1 hour 15 minutes

Boots (20 minutes - active work)
Dying boots a darker color - 20 minutes

Socks/Cuffs (40 Minutes)
Cutting and designing pattern - 10 minutes
Sewing and hemming fur to socks - 25 minutes

Belt (20 minutes)
Cut and pin felt to belt - 10 minutes 
Sewing felt to sash belt - 10 minutes 


Total Cost - $25 dollars / Total Time 5 hours

So the main costume was a deal when it came to cost and, though the time frame was about what I expected, I am very happy with my first sewing project with my mother's machine.


Horned Helm and Shield 

A lesson in paper mache.


I thought everything was going super until Bro Bro pointed out that I didn't have a Horned Helm. 
Just look at that thing...how can I compete with that?
Thanks to Pinterest, I gathered some decent ideas of how to do a Paper Mache helmet. Most suggested using a wig head form thing or a balloon for the base. I didn't have either at home so I got experimental and made head form from tinfoil, duct tape, and gaffers tape. 

Now the aliens can't get into my brain!
I paper mached a skull cap, for all intends and purposes, from my super awesome head form, letting the firt layer dry atop the form itself to keep the right shape. I then gave it 2 more layers (allowing drying time in between each layer) of paper mache as well as a layer of Mod Podge Outdoor sealer stuff to ensure that it would with stand a day of being worn at Con and all the bumps and sweat it would undergo.

So Much Hot Glue!

I then crafted horn outlines with cardboard and, using gaffers tape again (thanks Husband and your career in lighting), I filled them out with newspaper. I then added 2 layers of paper mache (again, allowing drying time in between each layer) around each horn as well as a layer of Mod Podge Outdoor sealer stuff and then attached the horns to my skull cap.

Then, I hot glued the horns on, holding each horn in place while the hot glue cooled. After the horns were hot glued on, I paper mached around them at the base to secure them extra. Using cardboard, I made the rim/form on the armor on the helm.


Metal Casing...aka cardboard.

I then paper mached over the form and then hot glued rope around then base of the horns and paper mached over it to give the feeling of mounting for them. I then painted the heck out of the helm and sealed it again with Mod Podge and then added felt in the inside of the hat to keep it comfy. 

Making it work...


Check out this stuff!

I also made a shield. I used 4 layers of cardboard, glued together with wood glue and then pressed for several hours with heavy books. I then paper mached 3 layers (focusing on making the edge smooth and look like one piece) as well as a layer of Mod Podge Outdoor sealer stuff. 

DJ helped me do the outline.

 Primed it white, drew the design, and painted in with several coats of acrylic paint and, again, Mod Podge sealed it up

Looking good!
For the hand/arm holds, I covered cardboard with fabric, form arm loops out of them, then hot glued the holds to the back of the shield. I am pretty stoked with how it has come out even though I decided to not lug it around the Con.

I let things dry in the Bathroom. What?

There will hopefully be a photo shoot for this cosplay in August with Kris. More photos to come.:)


Monday, July 28, 2014

BFMH: Comic-Con Breakfast Sweet Quesadilla

So I figured I should try to make something easy to eat in the car for our trip down to Comic-Con. While trolling the Pinterest, I saw a recipe/post about Banana Peanut Butter Chocolate Quesadillas.

Now those sound pretty amazing (and easy) in my opinion.

Wrong.

I know that the big problem is that I made them the night before. I spread the peanut butter (use vegan if desired!) on the tortilla (use vegan if desired!), mashed the banana with a bit of honey and applied it, and then sprinkled on some chocolate chips. Wrapped them up in tin foil and figured to save dishes the next day, to rock out the old college trick of using the iron to heat them.

Whelp, I got up the next morning and "cooked them up". I figured I would eat mine before getting in the car, so I cracked open the tin foil to find a soggy, sticky mess. It was edible, and the flavor was great, but in no way was it appropriate to eat for no mess in the car.

Ewwwwy Gooey Mess.

Next time, I will make it fresh, not mash the banana, use less honey, and cook it on the George Foreman.
Not a good looking breakfast at all...


Not a total loss, but far from a success.

Friday, July 25, 2014

A nearly perfect recipe (IMHO) for Chocolate Chip Cookies

So I really like Chocolate Chip cookies. Specifically, homemade ones. Husband really likes a recipe his mom (my MiL) has perfected over the years. For me, it has too much shortening. Normally, I make her recipe with half butter and half butter flavored shortening to make it a pretty decent cookie. Yet, for some weird reason, this week I dug deeper and attempting to figure out the best way to make a cookie to my taste preferences. Using this pin, I configured my attempts at making the best cookie for my taste buds. I decided to add extra flour, use both leaveners, and refrigerate the dough for 24 hours.

My somewhat perfected Chocolate Chip Cookie Recipe

Ingredients:
1 cup plus 2 tablespoons (5 ounces or 142 grams) all-purpose flour (Instead 2 cups)
1/2 teaspoon baking soda (Instead 1/4 teaspoon baking powder and 1/4 teaspoon baking soda.)
1/2 teaspoon salt
1 stick (4 ounces) unsalted butter, at room temperature
1/4 cup plus 2 tablespoons granulated sugar
1/4 cup plus 2 tablespoons packed brown sugar
1/2 teaspoon vanilla
1 large egg
1 cup semi sweet chocolate chips
directions:
Preheat oven to 350°F. Line baking sheets with nonstick baking mats or parchment paper.
In a medium bowl combine the flour, baking soda, and salt.
In the bowl of an electric mixer beat the butter, granulated sugar, and brown sugar until creamy, about 2 minutes. Add the egg and vanilla, beating well to combine. Gradually beat in the flour mixture. Stir in the chocolate chips. (OPTIONAL: Refrigerate dough for 24 hours) Scoop 1 1/2 tablespoon-sized balls and place onto prepared baking sheets.
Bake for 9 to 11 minutes, or until golden brown. Cool for 2 minutes before removing to wire racks to cool completely.


After making them, I think that I will be adding only 1/2 a cup extra of flour. This batch didn't spread at all which Husband didn't seem to like as much.

Thursday, July 24, 2014

Look what you did to him!


When I was doing what I do and trolling for ideas on Pinterest, today's adventure popped out at me. I love an apple pie with a cheddar crust. While many people seem to think that is strange, I was raised eating apple pastries with a bit of cheese so this excursion sound good and right to me.

Apple Gouda Oatmeal Cookies
Makes 24 cookies
2/3 cup extra-virgin olive oil
1 egg
1 teaspoon vanilla OR 1 tablespoon dark rum
3/4 cup flour
1/4 cup firmly packed brown sugar
1 teaspoon powdered ginger
1/2 teaspoon baking powder
1/2 teaspoon salt
1 1/2 cups old-fashioned oats
1/2 cup golden raisins
1 medium-sized apple (about 10 ounces)
4 ounces Gouda cheese, finely chopped (about 1 cup)
Preheat the oven to 375°F. Whisk the olive oil and egg together in a glass measuring cup until completely combined. Whisk in the vanilla or rum. Set aside.
In a large bowl, whisk together the flour, brown sugar, ginger, baking powder, salt, and oats. Stir in the raisins.
Peel and core the apple. Use the coarse side of a grater to grate it directly into the flour. (You should have 1 1/2 to 2 cups of shredded apple.) Stir in the apple and the chopped Gouda.
Add the liquids from the measuring cup and stir just until everything is moistened. The dough will be loose and clumpy. Drop in large spoonfuls on an ungreased baking sheet. Bake for 17 minutes, or until the cookies are golden. They will be very soft still. Let them cool on the baking sheets for 5 minutes before removing to cooling racks to cool completely.

Store in an airtight container at room temperature for up to 5 days.


My only qualm with this dish is just the baking time really, but that really can't be helped. I probably should have left the raisins out for my own personal taste buds <stupid raisins, get out of my cookie!>, but as this was shaping up to not be a sweet ,desserty cookie, I figured that they would be welcome in a more savory bite sized food. Though as I think about it further now, I don't really like raisins unless they are in a bread pudding or carrot or broccoli salad. Ah, well, too late now.

These are good. While they don't seem to have a long shelf life, I definitely like the flavor (well, not the raisins, but they aren't too strong) and the texture (again, not the raisins, why did I think it would be ok?).

Husband enjoyed the novelty of them as well as the flavor and was happy o have them to take along on our adventures to SDCC and beyond. Yes, there is a beyond...it is called going the family cottage on Crystal Lake (Not THAT Crystal Lake).

Until the next snack cookie...


**Today's title is from Friday the 13th as I am headed to my own Crystal Lake next week.**

Wednesday, July 23, 2014

A Land of Milk and Honey...Protein Balls

In the quest to have a good selection of foods to nibble on while at Con and traveling, I found some protein ball recipes that looked very enticing. More so than the "Oatmeal with Peanut Butter" ones.


Milk and Honey Peanut Butter Balls

2 to 3 dozen balls, depending on size
1/2 cup natural unsweetened creamy peanut butter
1/3 cup honey or agave syrup
1/3 cup unsweetened coconut
1 cup malted milk powder (substitute regular milk powder for gluten-free version)


Mix all ingredients until they form a crumbly, sticky mass. Roll into balls. 


This is what the look like following the recipe.
I am sure it is because I didn't have quite enough dehydrated milk, but these look/feel too soft for sitting in a over packed bag at a Convention. So I have decided to take them the extra mile and make them into buckeyes by dipping them into chocolate.


Chocolate Armor Activate!

While I haven't tasted them, (I left them to cool and started writing), I can only guess that they are gonna be excellent. If not, you KNOW I will be updating this post. 

Until the Next Convention Prep Week....


Tuesday, July 22, 2014

Crockpot Ribs

After an excellent weekend away, I was sent home with some pork ribs...

How, oh, how to prepare such ribs....?

TO THE PINTEREST! 

And thus I found this pin and the original post.

Crock Pot Coca-Cola Baby Back Ribs Recipe!
INGREDIENTS:
1 rack Pork Baby Back Ribs
1 can Coca-Cola
Salt and Pepper
1/2 bottle Barbecue Sauce

METHOD:
Salt and pepper ribs on both sides.
Wrap ribs around outside of crock pot.
Pour Coke over ribs and cook for 8-10 hours on low.
Cover a oven safe pan with aluminum foil.
The meat will be falling off the bones, so carefully transfer the ribs to the foil lined pan (meaty side up).
Cover ribs with barbecue sauce and place under broiler until sauce starts to sizzle and caramelize.
Remove from oven and serve.


Monday, July 21, 2014

BFMH: Honey Butter Chicken Biscuit

So Whataburger has my favorite this ever, the Honey Chicken Biscuit. While we were in Phoenix the other week, I saw a Whataburger and ever since, all I can think about is a Honey Chicken Biscuit. So I made some.

So I fried up the chicken boob, baked up some Icebox Biscuits, and whipped up honeyed butter.

Fried Chicken
In one bowl
1 egg beaten with a splash of milk
In another bowl
1/2 cup of flour with garlic salt, cayenne, all season, season salt, oregano, and paprika.
Dip defrosted chicken breast tenderloin into flour mixture, coating it fully.
Then dip into egg mixture and then again into the flour mixture.
Fry in a bit of oil on medium high heat until crisp and cooked through.

Honey Butter
Using softened butter, mix equal parts of butter with honey and enjoy.

Husband's extra long sammaich

Husband was very happy with the satiating breakfast of champions and I know that I will be making it again.
My teeny tiny version.

In other news: Here is a review of the new Club 33! Hooray!

Friday, July 18, 2014

PSA: The new "Tacky" music video has got me all riled up!

One reason Husband and I became friends in the first place was our love of Weird Al and ska. I found out he like both the first time we hung out solo when we went to go see an afternoon showing of "The Eternal Sunshine of the Spotless Mind" which came about a whole year before we (well, I) became romantically interested.

Here is one of my favorites from Weird Al:


He also does amazing little clips like this, thanks to Vine.

If you want to see something spectacular, go here.

It is a stunning piece of work by one of the greatest comic minds of our time.

You're welcome.


Thursday, July 17, 2014

Comic-Con and Michigan Packing

I am terribly excited about Husband and my adventure to San Diego Comic-Con weekend followed by the lovely Moller Cottage on Crystal Lake in Frankfort, Michigan as well as some time in St Louis, Missouri. I'll be gone for a week and a half.

In the world of packing, this is quite a challenge in selection and quantity. There are two very excellent facts to keep in mind though: A) SDCC bags can go home with Aaron Aranda! and B) Fortunately, there is a washer dryer every where we will visiting! YAY! So much easier!

To Be Packed in SDCC BAG

Captain Jack Cosplay
Roxy Richter Cosplay
Hiccup Cosplay
Pajamas
A comfy and appropriate dress in case I am sick of Cosplaying during a day.
A go out party dress for all the rad parties (Preferably, designed after Cat Bug)

To be pack for Michigan/STL

Travel Outfit – Worn 2 times -  Sunday (7/27), Friday (8/1) and Sunday (8/3) for flight
Sundress 1 – Worn 2 times - Monday (7/28) and Thursday(7/31) - Black with Hearts
Sundress 2 – Worn 2 times - Tuesday (7/29) and Saturday (8/2)  - Blue Maxi Dress + White Tank
Sundress 3 – Worn 2 times - Wednesday (7/30) and Sunday (8/3) - Church Appropriate/Dinner Out 
Swimsuit and cover up dress – Worn 4 times - Black 1 piece and Brazil 2 piece, 
Running Outfit
Pajamas
Sweater and Leggings (as it gets chilly up north in the evening)
Running Shoes
Flats
Flip Flops


Besides packing clothes and cosplays, the other important thing to be packed are snacks and food as you might recall from this post.

Great news is that I am super duper fortunate as my best friend, who is doing a fitness test group thing that gives her premade meals, gave me a grip of lightweight food containers. These will be great for taking the food to the Con and then being able to just throw the plastic in the recycle bin. :) Hooray!

I love Husband because he is honest and reasonable when it comes to food and Conventions or travel. He is on board to save a bit of money (as wells as ingesting less preservatives/low value foods) while we are out and about. Not to say we don't indulge in a hot dog now and then, but saving ourselves from eating that way every meal every day that we are away is a good thing.

So everything is planned, now I just need to put it in a bag and ready it the trek!


A special request: Pray that we can get a hotel for Comic-Con weekend. We have a back up place to stay, but I don't want to inconvenience friends with late nights and possible raucousness.

Wednesday, July 16, 2014

I'm sorry I messed up your barbeque.

Best part of summer.....? Barbeques!! 

Specifically, corn. I love corn. No nutritional value, but so much delicious. 

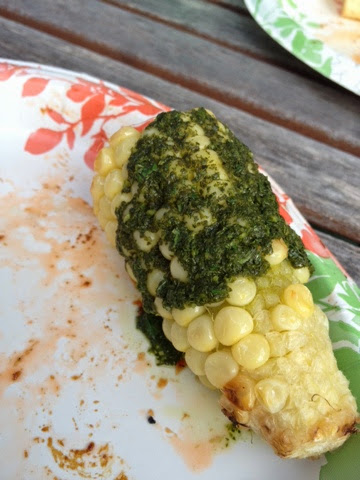
Roasted Corn with Cilantro Lime Pesto!
Ingrediants:

  • Corn on the Cob
  • 1/2 Cup Cilantro leaves, large stems removed
  • 2 Tbsp fresh squeezed lime juice
  • Garlic clove chopped finely
  • 1 tsp. Kosher salt
  • 1 tsp. Black pepper
  • 1/4 Cup Vegetable oil
  • 1/4 Cup Olive oil
  • 1/4 Cup Butter (leave out for vegan)

Instructions

  1. 1. Peel back the husks of the corn, keeping them attached. Remove the silk, then fold the husks back over the corn. Soak the corn in cold water for 10 minutes. 2. Preheat one grate of a well-oiled charcoal or gas grill to medium-high and another to high. 3. Place the cilantro, lime juice, garlic, salt, and pepper in a food processor or in a blender and blend. With the machine running, slowly drizzle in the oils. Set aside. 4. Place the corn, still covered by the husk, on the medium-high grate. Cook for 3 minutes, then turn to the other side, and cook for 3 minutes. Remove from the grill, peel back the husk, return to the high grate to cook the corn on all sides, turning as need for 5 to 7 minutes. Allow corn to cool a little, then rub a little butter on each, and finally, spread the pesto over just before serving.


I loved this! I think it could have used another clove of garlic, and maybe have it roasted a bit instead of just raw.

Until the next cookout...


**Today's title comes from The Simpsons: Lisa: I still stand by my beliefs. But I can't defend what I did. I'm sorry I messed up your barbeque.
Homer: I understand honey. I used to believe in things when I was a kid.**

Tuesday, July 15, 2014

Golabki, Golumpki, Gawumpki (spelling?)

There are several Polish delicacies which I have heard both Husband and Kimmy G talk about regularly: Pierogi, Chrusciki, and Golabki. God help me, I have no clue if I spelled any of those correctly....

While some might think that stuffed cabbage rolls are the epitome of comfort food, my Germanic/Scottish heritage raised by a Francophile can’t bring itself to agree.

Typically the cabbage rolls are stuffed with pork and beef mixed with rice and are then cooked in the oven or on the stove until tender.

The Polish call them goÅ‚Ä…bki (gaw-WOHMP-kee), which literally means "little pigeons."

There are two popular sauces are used to complete the savory wrapped bundles.

One sauce I found (but didn’t make) is pretty much beef stock gravy which you cook the bundles in and then garnish with a bit of sour cream. Sounds pretty nice, but Husband expressed that his Bapcia (Babcia is the universally acknowledged spelling) made hers with the tomato sauce. So I looked for a recipe following that line of thinking.

Here is the recipe from the best looking pin I found:

Gołąbki {Polish Cabbage Rolls}
 Ingredients
1 head of cabbage, cored
1 tablespoon vegetable oil
1 medium onion, chopped
2 garlic cloves, minced
1 teaspoon cinnamon
¼ teaspoon nutmeg
16 oz. tomato sauce
2 tablespoons brown sugar
2 tablespoons red wine vinegar
1 lb. lean ground beef (or half it with ground Pork)
1 cup cooked rice (I used brown)
1 egg, beaten
1 teaspoon salt
½ teaspoon black pepper
Method:
Bring a large pot of salted water to a boil. Boil the entire head of cabbage for 12 to 15 minutes or until tender enough for the leaves to be pulled off and rolled. Drain the cabbage and allow to cool while you prepare the filling and sauce.
Heat the oil in a skillet over medium heat. Cook the onions about 5 minutes, or until tender and translucent. Add the garlic, cinnamon and nutmeg and cook for 1 minute more. Remove half of the onion mixture to a large bowl. Stir the tomato sauce, brown sugar and vinegar into the skillet with the remaining onion mixture stir together. Simmer over low heat while you prepare the filling and the rolls, stirring occasionally.
Add the ground beef, rice, egg, salt, and pepper to the onion in the bowl and mix with a fork or your hands. On a cutting board, peel off 12 or more cabbage leaves and cut out the hard stem from each leaf in such a way that you end up with two long leafs for rolling. Place about 2 tablespoons of the beef mixture in the middle of each cabbage leaf half and roll up. As you roll them, place them seam side down in a 9×13 baking dish sprayed with oil. Pour sauce on top, cover with foil, and bake at 350 degrees F for 45 minutes or until cooked through.
Makes 20 gołąbki.


Per goÅ‚Ä…bek (cabbage roll): 100 calories; 6 g fat; 7 g carbohydrates; 1 g fiber; 5 g protein; 3 Points Plus


While this turned out very well, Husband did give me some pointers as did the oh so Polish, Kimmy G! It was agreed upon that it needed less rice and cinnamon/nutmeg and more sauce to good in as well as more cabbage leaves. I must have gotten a small head of cabbage because I only got about 10 bundles put together prettily. It was agreed by all that while is lacked this or that and needed more the A and B, it was good all in all. I ended up getting Bapcia's "recipe" (from the memory of Aunt Carol) in the long run and it turned out Bapcia did a gravy style of it as she didn't care for the tomato sauce. It was agreed between Husband and I that our family version of the Polish recipe would most certainly be with the tomato sauce.

Here's to new memories and traditions for our new family!

Until the next meal...


Monday, July 14, 2014

BFMH: Breakfast for Dinner - Low Carb Carbonara (a la HTFASA)

So this weekend we were away having a grand old time with some friends we made on our honeymoon, but this caused me NOT to get to make my breakfast for Husband. So I figured I would make a breakfast for dinner.

I ran a few ideas by husband from the wonder that is Pinterest and, while the dish I ended up making isn't traditional made for breakfast, Husband requested Deconstructed Paleo Carbonara as "Breakfast for Dinner" this week.

If you are thinking "Wait! Why would you deconstructed before I even know what this dish is?!!?" there here is a recipe of a typical Pasta Carbonara.

TYPICAL PASTA CARBONARA
thin spaghetti, one serving
salted boiling water
3 strips bacon, cooked well done in microwave; crumble (leave out for Vegetarian)
1/2 clove elephant garlic
1 tbsp. good quality olive oil
1 egg
freshly grated Parmesan cheese
freshly ground black pepper
Here is a reduce calorie version of this classic.
Serves one.
Put water on to boil. Meanwhile, place 3 strips bacon on paper towels and microwave until crisp cooked. Set aside. Mince garlic. Place in large microwavable bowl. Add oil. Microwave garlic and oil mixture until translucent--about 3 minutes on 30% power. When water has come to a boil, add thin spaghetti. Crack egg into garlic mixture and add ample amount fresh ground black pepper (the 'carbonara'). Add 1-2 tablespoons freshly ground Parmesan (or Romano or Asiago or combination) cheese. Beat together with a fork.

As soon as pasta is cooked al denté, drain rapidly. DO NOT RINSE; DO NOT ALLOW TO COOL. Rapidly toss pasta with garlic mixture. The heat of the just-cooked pasta will cook the egg. Crumble bacon over the top.


Now on to making it diet appropriate for myself with the help of my uber great friend, Kris!


LOW CARB NO PASTA CARBONARA (as lifted from How To Feed a Starving Artist)
Ingredients
1 large zucchini, peeled into zoodles
1 garlic clove, minced (use as much or as little garlic as you like)
1 slice of bacon, chopped
salt and pepper
1 egg
Bring a pot of water up to a boil. I salt my water to help make peeling my egg easier. Some people throw in vinegar, baking soda; do whatever trick you like.
Once the water is boiling, lower to a steady simmer and gently place your egg in the water. Simmer for 5 1/2 minutes.
While the egg cooks, cook your bacon in a nonstick pan. Once most of the fat has rendered, toss in your garlic. When the garlic and bacon are super fragrant, add those zoodles! Cook up the zoodles in your bacon and fat and let all those flavors get happy together. Season with salt and pepper to your liking. I usually don’t use any salt, I find the bacon salty enough and really enjoy the natural sweetness of the zucchini. To each their own.
When your timer goes off, turn off the heat on your zoodles, and remove your egg. Rinse under cold water for 1 minute.
GENTLY peel the shell off of the egg. Holy hell, Batman, was this tricky! Since the yolk isn’t set, you can’t just smash it like you do when it’s  a hard boiled egg. Once you’ve got that bad boy peeled, place it onto of your zoodles, cut into it, and enjoy!
Cooking it up!
The yolk makes the sauce!

I did end up changing the dish a LITTLE bit to work with my cooking strengths. I poached the egg instead of boiling it in the shell because I knew that I would be able to peel it calmly and without frustration. I added extra garlic, cus I loves it, as well as some roasted sweet peppers I had roasted last week. I used the "ends and pieces" of bacon you can get at Trader Joe's simply because I haven't been using bacon strips lately. Also, I can use the small pieces, which are cheaper that a pound of fatty strips, in veggies or salad this week.

Husband thought it was a very delightful and was thoroughly impressed with the zoodles! Hooray! Those will for sure be happening again.

Friday, July 11, 2014

And there's an "I" in meat pie. Anagram of meat is team... I don't knowwhat he's talking about.

I have made all sorts of of different meat "pies": Cottage (beef), Shepherd's (lamb), and now I have made Swineherder's Pie (pork)!

The recipe is simple enough.
Ingredients
2 cups vegetable stock
2 carrots, diced
1 cup peas
1 yellow squash, diced
3 cups shredded pork
Salt and Pepper
4 potatoes, boiled and mashed with a bit of salt and cream
1/2 cup cheddar cheese  
Method
Combine carrot, peas, squash, and pork together and season with salt and pepper.
Simmer with stock over medium heat for 8 -10 minutes. 
Put in casserole dish.
Spread mashed potatoes over pork and veggies.
Sprinkle cheese over potatoes and, using a fork, create a pleasing pattern in the taters.
Bake at 350 degrees for 45 minutes.


You can, of course, add what ever vegetable strikes your fancy for this concoction, but I stick to the squash and starchy veg.


This was ok. I think nest time about adding some corn, some spices like basil or thyme, maybe some garlic and onion into the veg portion. Maybe some sour cream into the mash, too. It just needed and little something else.

Our guest, Gill, who came over to play Magic with us, was very pleased with it. Now I don't know it that is because I made food or if it had to do with the subtly in flavor, but he assured me that it was an good meal.

Until the next meal....


**Today's title is from Shaun of the Dead: Shaun: As Mr. Sloan always says, there is no "I" in team, but there is an "I" in pie. And there's an "I" in meat pie. Anagram of meat is team... I don't know what he's talking about. **

Thursday, July 10, 2014

Why the nature of society stinks right now...

I got a swanky new Ukulele for my birthday last spring.

It is super pretty and I really love playing it. I even want to try to play it at church, but standing and playing is a little hard on the muscles in my arms I don't have yet. So I decided to order an ukulele sound hole strap from Etsy to assist with the weight as well as keep it away from body for a much more pleasant and fuller sound.

I ordered it and then about 3 days later, I got a conversation message from the lady whose store I ordered from. She explained her father had past away and had not been able to turn off or pause her store while she was in mourning. She apologized a few times in the brief email and explained she would get it out today if I was still interested.

I wrote her back words of empathy and understanding. I let her know of my lose and that I could sympathize with her loss and that with time it would get easier to bear it. I told her she could wait on getting my order out if there was still a lot to do while for the family. I then apologized if I spoke out of turn by volunteering my prayers and thoughts.

An hour or so after I sent my reply, I received another communication from the vendor. Which went like this:

Thank you so much for your kindness. I was preparing to be chewed out, so your compassion was an unexpected kindness that I will never forget. Your order will go out this afternoon. I have learned important lessons from this experience:


1. I must check the emails, every day, or have someone else check them when religion prohibits it (we aren't supposed to do any work during the seven days following the death of a parent, spouse, or child).


2. That there are still wonderful, compassionate, forgiving persons like yourself in the world. I will try to pass it forward every day of my life.


Thanks again, you've had a major and very positive impact in my life at a very difficult time.


Your order should arrive in less than a week, and my other buyers have been quite satisfied with this ukulele strap. I've purchased several myself and use them every day, it makes playing much easier. Please let me know if you have any issues or concerns.


Bless you and have a wonderful day

I am astounded that she had to feel like she was going to be chewed to out. Any Etsy store I have dealt with in the past has been one single person or at most a duo or friend or family. Why in the world has the business world (esp in the world of small business) forgotten that personal tragedy is a completely legitimate reason? It reminds me of the story about the woman who was irate that she didn't get service over Thanksgiving.

We live in such an entitled, instant gratification, and thankless world. It breaks my heart. I try to express my gratitude to people, especially in customer service, every time I come into contact with them. I empathize if I can tell they are having a rough or bad day. I try to be genuinely interested in their well being.

I think that the saying All You Need Is Love can be very true when it comes to day to day interactions. Just give a little and you will receive it back in 10 fold. 


Truth.
++++++++++++++++++++++++++++++++++++++++++++++++++++++++++

Even while I am on my high horse thinking about all the good karma I send out, I think of the few times I haven't been as understanding. I did get stupid passive aggressive the other day at a store when the clerk was trying to tell me I couldn't use to coupons in one transaction, when I clearly said I could on both coupons. I wasn't upset about the coupon not being on the transaction, I was upset that the clerk was making up an excuse (an extreme version would be "lying") to me. I don't think that she knew why they weren't working, nor did I. Just don't try to smoke screen a long time clerk with cashier jargon. It doesn't settle well. I, of course, went on to have many hours of guilt over this little outburst and have sworn to be better.