Friday, July 31, 2015

An attempt at Peach Cobbler

Nothing says summer to my husband, Pigeon, more than peaches. So I had him get some from Eckert's (an amazing orchard in the area) and I attempted a peach cobbler.


Easy Peach Cobbler

Ingredients
1/2 cup unsalted butter
1 cup all-purpose flour
2 cups sugar, divided
1 tablespoon baking powder
Pinch of salt
1 cup milk
4 cups fresh peach slices
1 tablespoon lemon juice
Ground cinnamon or nutmeg (optional)
Preparation
Melt butter in a 13- x 9-inch baking dish.
Combine flour, 1 cup sugar, baking powder, and salt; add milk, stirring just until dry ingredients are moistened. Pour batter over butter (do not stir).
Bring remaining 1 cup sugar, peach slices, and lemon juice to a boil over high heat, stirring constantly; pour over batter (do not stir). Sprinkle with cinnamon, if desired.
Bake at 375° for 40 to 45 minutes or until golden brown. Serve cobbler warm or cool.


I really liked the flavor the cobbler got thanks to be cooked in the cast iron. While I have not yet found the perfect cobbler recipe, I am enjoying attempting different ones as it is a relatively easy dish that makes Husband most glad.


Until next time...Cook it up!

Wednesday, July 29, 2015

Pax Cosplay: Val from Table Titans


So another Cosplay I decided on was Val from Table Titans. No, she is not from a video game, but she is from a Web Comic that is an affiliate of Penny Arcade, so I feel like she will be a good choice for PAX. Here are some pictures of her.


Here she is realizing that as a Dwarf, she does in fact love a troll. 
Note the green dress with fur lining. In this rendition, I assume she has either pants or leggings on that are dark green.


War version of Val


This is how she envisions herself while she is playing DnD. I love the fur lined boots as well as the additional fur lining on the bottom of the dress. The bracers and belt look great too,


That hat though!


So I decided that I would do a version of her in her green, fur lined (both neck and bottom) dress with Brown fur cuffed boots, a brown belt, and then her little horned helm as shown in the last picture above.


I found this dress ($3) at the thrift store:


I removed the arms and cut the neck out just slightly to give it a bit more of a plunge. I then added the fur neck line and bottom ($2 for fabric). I paired it with my thick brown belt.


Here is the fabric I chose. 


Partially cuffed! 


Fully cuffed with belt option!


I then found a pair of brown boots (Dr Scholl's!) at a thrift store ($13). I took a holey pair of Husband's socks and cut out the feet (too thick of a sock for basic wear). I added a fur cuff to them and tadah! I have boots that LOOK like they are fur cuffed, but aren't so I can still use them this fall time!


I can wear them with most any boot!


Ta-dance!


Here is the start of her hat!


And here is the last of it! 

(I will add freckles with my eyeliner pencil the day I wear it.)

Looking forward to seeing how this looks all together at convention!!

Yay PAX!

Friday, July 24, 2015

The best Roasted Cauliflower EVER


This little Recipe has proven it self worthy of a post.


I would like to introduce to you, Parmesan Roasted Cauliflower with Garlic and Onion aka pure heaven.

Ingredients

1 head cauliflower

1 sliced medium onion

4 thyme sprigs

4 unpeeled garlic cloves

3 tablespoons olive oil

Kosher salt

Freshly ground black pepper

1/2 cup grated Parmesan

Preparation

Preheat oven to 425°F. Cut 1 head cauliflower into florets; toss on a large rimmed baking sheet with 1 sliced medium onion, 4 thyme sprigs, 4 unpeeled garlic cloves, and 3 tablespoons olive oil; season with kosher salt and freshly ground black pepper. Roast, tossing occasionally, until almost tender, 35-40 minutes. Sprinkle with 1/2 cup grated Parmesan, toss to combine, and roast until cauliflower is tender, 10-12 minutes longer.


I would like to introduce to you, Parmesan Roasted Cauliflower with Garlic and Onion aka pure heaven.

nom nom nom


I was blown away by how delicious this was. Make it. For realz...

Until the next meal...Cook it up!


Wednesday, July 22, 2015

A first: I Roasted A Whole Chicken!


I know this is ridiculous....I have NEVER roasted a whole chicken. I have done whole fish, whole turkeys, whole loins, but never a whole chicken. Until now...!


I used this recipe from the Pioneer Woman:


Here’s what you’ll need:


* 3-4lb Whole Chicken
* Something to stuff inside the chicken (Apple, Onion, Garlic is what I used)
* Canola Oil
* Salt and Pepper
* Fresh Herbs (Rosemary, Sage, and Thyme is what I use)


Preheat your oven to 450 degrees while you pick the herbs from their stems.


Then you’ll need to give all those herbs a chop.


Toss those herbs into a bowl and add in your salt and pepper.


For EACH chicken you’ll be roasting, you’ll need:


* 1-2 Tablespoons of chopped herbs
* 1 Tablespoon of salt (kosher is best)
* 1 Teaspoon of pepper


Add to that 2-3 tablespoons of Canola oil…And give it all a stir.


Before we apply our herb mixture to the outside of the chicken, we’ll need to fill the cavity of the bird with our aromatics. Stuff those aromatics into the nether regions of your chicken… No need to truss the chicken, unless you really want to.


It’s important that your whole chicken be patted dry with a clean cloth or paper towel. This will help to insure a nice crust on your chicken once it’s finished. Begin rubbing the chicken down with your canola-herb-salt-pepper mix. No need to get crazy with it. It’s just a chicken. Just be sure to rub it down on all sides…


Slide your herb coated chicken(s) into that 450 degree oven for an hour to an hour and fifteen minutes until they are golden brown and have developed a delicious crust.


Once the chickens have roasted, it’s good to let them rest for 10-15 minutes. This will allow all of the juiciness of the bird to redistribute to the right places. If you tore into it right away…all its goodness would run out and you’d be left with a dry chicken. And that’s a no-no.


So purdty!


Apple Bottom Chicken!


How sexy is this chicken? Plus, how EASY was this chicken? I would leave out 1 Tablespoon of salt and stick with just 1 going on the chicken as it felt a little to salty to me. Other wise, roast this bad boy up and serve with pasta masala.


Until the next meal...Cook it up!


Friday, July 17, 2015

Glo Run Team: ELECTRIC PINEAPPLE


So I have never done a "theme run before" let alone done a run with people I don't normally run with. You can imagine my excitement for the Glo Run that I will be joining in on in August with my Step Sister, Niece, and friend Mel.


Mel and I decided we wanted to make team shirts so we got sizes from the rest of our "team" and I got some Glow in the Dark Tulip Paint and we went to town. We knew we wanted the statement "You glow, girl" on the shirt in someway, but that didn't seem like a team name. After a glass of wine, we decided that "Electric Pineapple" was the best name ever. Thus our team name became epic.


We decided that, obviously, we needed a  glow in the dark pineapple on the back of our shirts:


Pineapples on the back!


Here is our inspiration.


Here are the shirt fronts: (In white paint we have the "You Glow, Girl!" written below the Electric Pineapple title.


Oh, the delights of DIY

Wednesday, July 15, 2015

Pax Prime Cosplay: Ellie


So Pax Prime is coming up soon and Husband and I are attending with the Daves. As I have a) never been to Seattle and b) not been to PAX Prime, I am thoroughly excited about this trip! At the last PAX Convention I attended, I cosplayed as Roxy Ritcher.  This time around, I know better. I will be cosplaying as Ellie from "The Last of Us" as well as a character from a Web Comic that is a PAX Affliate. That one will come up later.


As you can see, Ellie is a 14 year old girl who is pretty much wearing stuff you can find right now.

Fortunately, I have a pair of jeans and a black long sleeved thermal already. All I "needed" to get is a pair of black, blue, or brown Chuck Taylors (which I wanted anyway, though I ended up using my orange high tops as I already had them and Chucks are expensive), a dark green backpack, and a shirt that looked like the red shirt she wears throughout the game. The backpack easy and cheap ($13) thanks to Amazon. The shirt, on the other hand, was harder. I COULD buy it for like $25 and it wouldn't look vintagey. Why in the heck would I do that?


Thus begins the Arts and Farts and Crafts time!


First off, I found the graphic online. I printed out 3 copies on thick grade cardstock. Using an Xacto knife, I cut out all the parts that needed to be black on one, all the parts that need to be blue on another, and all the parts that needed to be yellow on the last one. Then I laminated them and cut it out again. I did that just to give the stencil a bit more firmness.


Then I hit of the thrift store and got a shirt for $1 that was close to the right color. Boom! Not $25 spent! SO I got together my paints (already hade, but they were $2.50 for the 3 colors), sponge brush ($1), an old magazine (to put in the shirt to keep the shirt from drying together) and masking tape (had). I taped a guide for my stencils so things could line up nicely and put the magazine up the shirt as a firm surface for my art work. I started with the Yellow stencil as it is the lightest color (easiest to apply color over) and the background of the palm trees.


The tape lines are for lining up my homemade stencils!


Gotta stay in the lines!
First level! Tadah!
Then I let the yellow dry completely. after a couple hours I went back and added the light blue waves.


Now on to the second color!
Waves!

After letting the blue dry, I added the black layer. Unfortunately, on my first try, my sponge brush had water in and the black lines are not crisp for the most part. I tried to dab up some moisture, but for the most part, I thought the shirt was ruined. I let it dry and tried the black layer again with a DRY sponge brush and it turned out ok. Her shirt is filthy during the game and it kinda added to the "not brand new" styling I was looking to get.

Boom, Cosplayed!


I will post some pictures of both of my Cosplays from Pax when I post pictures from said convention.


Keep it real, y'all...

Friday, July 10, 2015

Beet Hummus


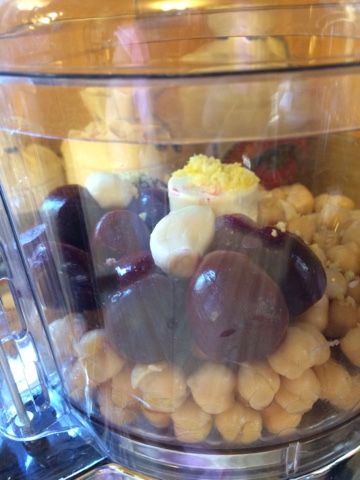
I am on a beet kick, I know. MiL has had a BUNCH come up from the garden so I have been working with them way more than I ever have before. This turned out to be a good spread for sandwiches, not for dipping. I would have a half batch next time and then make a batch of regular hummus with the other half a can of Garbanzos.

Here is a quick recipe (if you have a food processor) for Beet Hummus:
Ingrdeints:
1 cup beets
1 can garbanzo
3 cloves garlic
1 tbs lemon zest
1/4 lemon juice
Blend until smooth.

Food Processors make life SUPER easy.

While the taste is so-so, the color is amazing!

Until the next less than awesome dish...Cook it up!
Wednesday, July 8, 2015

Beets Citrus, Tomatoes, Oh My!

You have probably gathered that it is hot here in St Louis...like ick.

So here is another dish for those of us who find when it is over 95 degrees, you don't want to eat something hot.

Today's salad is made up of very basic (and chilled) ingredients:
Pickled Beets (pickled with Apple Cider Vinegar, Sugar, Salt and Cinnamon)
Mandarin Oranges (I got a can of them)
Tomatoes (Sliced and Deseeded)
and
Goat Cheese
with Balsamic Reduction


No, it isn't filling in the long run, but it saves you from bubble gut as I call it. When you get so warm after you have eaten, you feel like your stomach just keeps expanding every which way. OH, it's just me that gets that? Well, I like this dish for summer.

Until the next unbearable day....Cook it up!

Friday, July 3, 2015

Happy Independence Day!

We will be starting a new to me tradition this year: being at the Kirkwood fourth of July celebration.


That being said, I would rather be on the beach with Jamie right now.