Showing posts with label Side Dish. Show all posts

Thursday, October 15, 2015

Polish Potatoes, Slaw, and Smoked Sausage

We had 8 people at table the other evening in honor of one great lady we know as. She past away 3 years ago on Oct 21, 2012 at the age of 96. In honor of her, I decided that since I was hosting family dinner this week, that it should a bit of a Polish flare. I decided, also, that it needed to primarily be a make ahead meal, so that I could play hostess to the best of my ability.


For the cost of $17.20, I fed 8 adults and still have about 2 helpings left. So that would be $1.72/serving.


Sausage = $7.50 for 3 packages


Head of Cabbage = $2.42
Onion = $.58
Apple = $1.60 for 2
Apple Cider Vinegar = $.05
Chicken Stock = Homemade $1.00
Potatoes = $.88
Garlic Cloves = $.20 for 5
Bacon = Quarter pound $1
Half and Half = $.30
Monterey Jack = $1.67


I put the thinly sliced the Cabbage, 1 Onion, and 2 Apples and put them with 3 tablespoons Apple Cider Vinegar and 1 cup of Chicken Stock into the Crockpot for 8 hours on low. It was an excellent side dish.

The day before the dinner event, potatoes I lightly boiled, till just tender, and then chopped roughly. I put in a casserole dish and added 5 minced garlic cloves and crumbled bacon on top of the taters. I pours about 1/2-2/3 of a cup of half and half over that and then topped with cheese. The moment I got home, I put them in the oven at 350 until the cheese was lightly golden.

The turkey sausage was fully cooked already, I just sliced and grilled on the George Foreman we got from Cousin Marion as a wedding gift. Easy peasy.


Wednesday, August 5, 2015

Green Beans and Onions of Yum

Another thing that really sells the summer to me is the magic of fresh vegetables. One veggie that really tickled my palate this year are Green Beans. MiL made some AMAZING versions of roasted green beans too, which definitely makes me want to eat all of them. This is a Tyler Florence recipe that I really like to use every year.


Green Beans with Onions and Crushed Almonds

Ingredients
Kosher salt
3 pounds green beans, trimmed of stem end
1/2 cup skin on sliced almonds
3 tablespoons unsalted butter
5 tablespoons extra-virgin olive oil
2 large onions, sliced thin
Freshly ground black pepper
Method:
Fill a large high sided skillet with some water, adding enough to be just shy of the rim of the pan by about 1 inch. Place over high heat and bring up to boil; add a big pinch of salt and the green beans. Cook for about 5 minutes, the beans should still be crisp. Drain the beans and then run them under some cold water to stop them from cooking. Reserve the beans while you start the onions.
Return the skillet you cooked the beans in to the cook top over medium heat. Add the almonds and toast stirring every now and then until golden, about 3 to 5 minutes. Remove the almonds from the skillet and reserve. Return the skillet to the heat and add the butter and olive oil and heat until the butter has melted. Add the onions, season with salt and pepper, and cook stirring frequently until the onions caramelize, 20 to 25 minutes. Add the cooked cooled green beans and almonds, and stir well to combine. Season with salt and pepper, to taste.


This dish is a one pot delight that everyone should try. Tyler Florence adds Thyme as well to his, but I don't care for that usually. You might love it though so give it a whirl!


Until next time...Cook it up!


Friday, July 24, 2015

The best Roasted Cauliflower EVER


This little Recipe has proven it self worthy of a post.


I would like to introduce to you, Parmesan Roasted Cauliflower with Garlic and Onion aka pure heaven.

Ingredients

1 head cauliflower

1 sliced medium onion

4 thyme sprigs

4 unpeeled garlic cloves

3 tablespoons olive oil

Kosher salt

Freshly ground black pepper

1/2 cup grated Parmesan

Preparation

Preheat oven to 425°F. Cut 1 head cauliflower into florets; toss on a large rimmed baking sheet with 1 sliced medium onion, 4 thyme sprigs, 4 unpeeled garlic cloves, and 3 tablespoons olive oil; season with kosher salt and freshly ground black pepper. Roast, tossing occasionally, until almost tender, 35-40 minutes. Sprinkle with 1/2 cup grated Parmesan, toss to combine, and roast until cauliflower is tender, 10-12 minutes longer.


I would like to introduce to you, Parmesan Roasted Cauliflower with Garlic and Onion aka pure heaven.

nom nom nom


I was blown away by how delicious this was. Make it. For realz...

Until the next meal...Cook it up!


Tuesday, May 5, 2015

Everything tastes better as a pie

So I don't know why this keeps popping up with I look up things that are low carb on Pinterest, but it does. The pie crust makes it obviously not low carb, but I decided to make it for my family any way.

Tomato Pie Recipe
Ingredients
1 pre-made or homemade pie crust
1 large sweet onion, sliced
5 - 6 very fresh, preferably farmer's market or garden tomatoes, sliced
1 cup mayonnaise (I halved it with Greek Yogurt)
1 cup cheddar cheese
1 teaspoon dried Italian herbs
1 cup sliced fresh mozzarella
salt and pepper
Method
1. Preheat oven to 350 degrees. Place pie crust in pie plate. Prick piecrust with a fork and pre-bake pie crust for 10 minutes. Arrange onions in the bottom of the pie in a circular formation. Then arrange sliced tomatoes, around in a circle, and some in the middle. Add salt and pepper. Combine mayonnaise, cheddar cheese and dried Italian seasonings in a small bowl. Mix well and spoon over tomatoes, leaving about 1 inch gap in between mayo and the edge of the pie so you can still see the tomatoes. Place sliced cheese on top of mayonnaise layer.

2. Bake for about 30 minutes, at 350 degrees, or until cheese is golden.


Notes: I totally didn't use that many tomatoes, nor a whole onion. I use about half an onion and only 5 Roma Tomatoes. I suppose that it depends on your pie dish size.


Until the next challenge...Cook it up!

Thursday, April 9, 2015

Garlic Roasted Cabbage

I love garlic. I don't love Cabbage. I really liked this dish! it really evened out nicely

Garlic Rubbed Cabbage
Ingredients
1 (approx 2lb) head of organic green cabbage, cut into 1″ thick slices
1.5 tablespoons olive oil
2 to 3 large garlic cloves, smashed (I used minced garlic that comes in a jar)
kosher salt
freshly ground black pepper
spray olive oil OR non-stick cooking spray
Directions
Preheat oven to 400F and spray a baking sheet with non-stick cooking spray. Pull outer leaf off cabbage (it’s usually dirty and nasty looking), cut cabbage from top to bottom (bottom being root) into 1″ thick slices.
Rub both sides of cabbage with smashed garlic
Use a pastry brush to evenly spread the olive oil over both sides of the cabbage slices
Finally, sprinkle each side with a bit of kosher salt and freshly cracked black pepper.
Roast on the middle rack for 30 minutes. Carefully flip the cabbage steaks and roast for an additional 30 minutes until edges are brown and crispy. Serve hot and Enjoy!


Before Roasting
I ended up only cooking it for 30 minutes on the bottom shelf (with out a flip) of the oven as Kris and I were busy making Salt Baked Salmon as well. I think that it I had made it the way it is directed to be cooked, it would be even better. Ours were a little crispy, though really quite delish with the smoky flavor. Sorry, I failed to take an after photo because we were so ready to dig in.

Try this out, even if you don't really care for cabbage. Roasting and garlic always makes it better.


Friday, March 27, 2015

Cravings: Zucchini Parm Crisps

This is a bit of a modge-podge dish. The side didn't really go with the main course, but Husband I enjoyed it no less. 


Zucchini Parmesan Chips
Ingredients
2 medium-sized zucchini
1/2 cup freshly grated Parmesan cheese
Garlic salt & freshly ground black pepper, optional
Directions
Place oven rack in center position of oven. Preheat to 425°F. Line a baking sheet with foil (lightly misted with cooking spray) OR parchment paper.
Wash and dry zucchini, and cut into 1/4-inch thick slices. Arrange zucchini rounds on prepared pan, with little to no space between them. If desired, lightly sprinkle zucchini with garlic salt and freshly ground black pepper. Use a small spoon to spread a thin layer of Parmesan cheese on each slice of zucchini. Bake for 15 to 20 minutes, or until Parmesan turns a light golden brown. (Watch these closely the first time you make them and pull them out of the oven early if the Parmesan is golden before 15 minutes!) Serve immediately.

Zuc Eyes!
While these were not "crisp", they were quite yummy and happily consumed. 

Cheesey yumminess...
The Zucchini Parm Crisps will be made again soon. 

Spicy(ish) and sorta Guac(ish) Chicken.

Wednesday, March 25, 2015

Cravings (St Patrick's Day): Fried Cabbage

I know this is late to be posted, but here it is no less.

Last year, I made Corned Beef and Cabbage. Unfortunately, that always leaves us with  so many left overs. Like so much it is wasteful. So I decided that this year I would make a pretty simple cabbage and pork dish.

Fried Cabbage
Ingredients:
3 slices of bacon
1/2 an onion, sliced
Salt and Pepper
Mushroom stems of an 8 oz mushroom package, finely diced
2 links of chicken Andouille sausage, sliced
1/2 head of Cabbage, sliced
1 cup of Chicken Stock
Method:
Cook up bacon and then saute onion in the bacon fat.
Salt and Pepper and cook until bacon is no longer raw and onion is translucent.
Then add finely diced mushroom stems and let soften.
Add chicken sausage to the mix.
Allow the flavors to intermingle a bit.
Then add cabbage and allow it to be braised a bit with the other ingredients.
Add chicken stock and cook until most of the moisture has been cooked off.

Cabbage!
I enjoyed this dish greatly and I hope you give it a whurl! Here are some other fun pictures from our St Patrick's Day evening!

No, I didn't have any cookies, but friends were very happy to enjoy a few!

Knife Water!

STL Friends!

We were the tidiest of patrons...

Wednesday, February 18, 2015

Back to the Classics: Steakhouse Edition: Glazed Carrots

I want to like carrots, but really, I don't. I will eat them as a healthy choice, but I never crave them or think "Dang, that carrot didn't taste like grass!"

The one thing I dislike more that a raw carrot is a cooked carrot. Mushy and amplified warm grassy flavor, not really up my alley. but then I found this recipe. I find roasting ANYTHING long enough will make it palatable. Add Balsamic, and I might just like it. So when I found the following recipe on one of my favorite websites, Budget Bytes, I knew I had to try it as a side dish for my Steakhouse Series.

Ingredients
1-2 lbs. carrots
2 Tbsp olive oil
¼ tsp each salt & pepper
2 Tbsp honey
¼ cup balsamic vinegar
1 Tbsp butter (left out)
Instructions
Preheat the oven to 400 degrees. Clean and peel the carrots. Cut the carrots into one-inch sections (cut on a diagonal for more visual appeal).
Cover a baking sheet with foil. Place the carrots on the sheet and drizzle with olive oil and then sprinkle with salt and pepper. Toss the carrots to coat. Place in the oven and roast for 40 minutes, stirring once half way through.
During the last ten minutes of cooking, prepare the balsamic glaze. Combine the balsamic vinegar and honey in a small pot. Simmer the mixture over medium heat for approximately 10 minutes or until thickened. Once thickened, turn off the heat and stir in the butter until melted.(I left it out)
When the carrots come out of the oven, drizzle with the honey balsamic glaze and toss to coat. Serve warm!

Not a great photo, more like a really bad one.
While I did manage to burn the carrots a bit, they turned out very yummy! I blame it on the balsamic vinegar (I use a white version) and honey. I don't see how it can be bad. There was still a lite flavor of grass, but if you put balsamic on something, I will eat it. Make these, even Husband who only like cooked carrots that have been cooked with meaty juices for 6 hours, found these delightful.

Until next time I am surprised at what I like...
 

Tuesday, February 17, 2015

Back to the Classics: Steakhouse Edition: Twice Baked Potatoes with Horseradish

PO-TA-TO. Boil 'em, Mash 'em, Put 'em in a stew.

Best side dish for everything. Hands down, hits the spot anytime I have them, even when they are horrid. The startchy goodness makes me FAR TOO happy and my inner fatty has to wrestle with me daily over this. Anyway, here is a spectacular rendition of a Twice Baked Potato without it being all cheddar cheese and bacon.

Twice Baked Potatoes with Fresh Horseradish
Ingredients
4 medium russet potatoes (about 7 oz. each), scrubbed and dried
5 Tbs. unsalted butter, softened
1/2 cup plus 2 Tbs. finely grated Pecorino Romano (3/4 oz.)
1/2 cup sour cream, at room temperature
1/4 cup half-and-half, at room temperature
2 Tbs. plus 2 tsp. finely grated fresh horseradish
1 Tbs. thinly sliced chives; more for garnish
Kosher salt and freshly ground black pepper
Directions
Position a rack in the center of the oven and heat the oven to 400°F.
Prick the potatoes a few times with a fork. Put the potatoes directly on the oven rack and bake until tender when pierced with a skewer, 50 to 60 minutes.
While the potatoes are still hot, hold each one with a clean dishtowel and cut off about one-quarter lengthwise. With a spoon, scoop the potato flesh out into a medium bowl, leaving enough on the skins that they hold their shape. Add 4 Tbs. of the butter to the potato flesh, and with a potato masher, work the potatoes until lightly mashed but not completely smooth. Stir in 1/2 cup of the pecorino, the sour cream, half-and-half, 2 Tbs. of the horseradish, the chives, 1 tsp. salt, and a few grinds of pepper and mix until combined. Mound the filling into the potatoes. Cut the remaining 1 Tbs. butter into 4 pieces and top each potato with a pat of butter. Transfer to a small rimmed baking sheet or baking dish. (The potatoes may be prepared to this point up to 6 hours ahead; cover and refrigerate. Add 5 to 10 minutes to the baking time.)
In a small bowl, thoroughly mix the remaining 2 Tbs. pecorino and 2 tsp. horseradish with your fingers. Sprinkle over the potatoes. Bake until the potatoes are heated through and the tops are golden-brown, about 20 minutes. Sprinkle with chives.


By the suggestion of Logan, I decided to rub the potato with olive oil and roll in cracked rock salt before plopping on the middle oven rack. Daaaaaaaanng.....I normally just do Crisco (I know, I am a fat kid) and salt, but the olive oil was solid. I don't think I will be going back.

This was a loverly change for the typical twice baked potato I make. It still had the creamy, cheesiness, but with a tang of spice thanks to the Horsradish. I would most certainly be making this again.

I didn't finish the rest of the food on my plate, but I did eat all of the twice baked potato. always a good sign.

Until the next starchy thing that makes my taste buds happy...

Friday, February 13, 2015

Back to the Classics: Steakhouse Edition: Creamed Spinach

I never liked vegetables as a child or a young adult. It is a thing. I have learned to like/at least eat vegetables over the course of my adolescences and learned to like them as an adult. There are still certain veggies I am not a huge fan of, but spinach was the first one I truly enjoyed and still have a tendency to crave. So I decided to make the least healthy way you can enjoy spinach (except maybe in Mac and Cheese Florentine), a little healthier.

Lighter Version of Creamed Spinach
INGREDIENTS:
1 Tablespoon unsalted butter
1/2 cup freshly minced onion or shallots
1 clove garlic, minced
1 1/2 Tablespoons flour
1 1/2 cups fat free milk
2 Tablespoons Parmesan cheese
3/4 teaspoon salt
1/4 teaspoon ground nutmeg
1/4 teaspoon freshly cracked black pepper
4 oz. reduced-fat cream cheese
16 oz. bag frozen chopped spinach, thawed and drained of all moisture
DIRECTIONS:
In a large sauté pan set to medium heat, melt butter. Add onion and garlic; cook until softened, about 5 minutes. Whisk in flour and cook 1 more minute. Reduce heat to low and whisk in milk, parmesan cheese, nutmeg, salt and pepper. Add cream cheese and mix until smooth. Add spinach and combine well with sauce. Cook 1 minute, until heated through. Adjust seasonings as desired. Serve hot.
Enjoy!

I wish I had broiled the cheese on top.
This recipe was very good and rather simple. My only issue is that it is a bit too creamy. I think that I could use only 1/2 a cup of milk and be happy, or only 2 ozs of cream cheese. Also, I think it needs a full teaspoon of salt, but that is a personal choice.

Here is something fun about Spinach!

Until the next Steakhouse Classic...

Tuesday, December 9, 2014

When you have some Butternut Squash and want something meatless...Part 2

Part 2 of Meatless meals. All the butternut squash!

Butternut Squash and Duxelles Casserole
8 oz. fresh mushrooms or mushroom stems
2 shallots, coarsely chopped (¼ cup)
1 ½ tsp. butter
1 Tbs. finely chopped parsley
¼ tsp. ground black pepper
1 cup 1% low-fat milk
2 Tbs. all-purpose flour
1 clove garlic, minced
¾ cup shredded Gruyère cheese (3 oz.), divided
⅛ tsp. nutmeg
1 (2.5 lb.) butternut squash, peeled, seeded, and cut into ⅛-inch slices
1. Pulse mushrooms in food processor 20 times, or until finely chopped. Transfer to bowl. Place shallots in food processor; pulse 20 times, or until finely chopped. Transfer to same bowl.
2. Melt butter in skillet over medium-high heat. Add mushrooms and shallots, and season with salt, if desired. Cook 10 minutes, or until mushrooms have released their liquid, most liquid has evaporated, and shallots are lightly browned, stirring occasionally. Stir in parsley and pepper.
3. Preheat oven to 350°F. Coat 9-inch deep-dish pie pan or gratin dish with cooking spray.
4. Bring milk, flour, and garlic to a simmer in saucepan over medium heat, whisking constantly. Cook 2 minutes, or until sauce is thick enough to coat back of spoon, whisking frequently. Whisk in 1/2 cup cheese and nutmeg, and season with salt and pepper, if desired.
5. Spread one-third squash in prepared pan. Top with 1/3 cup cheese sauce and half of mushroom mixture. Repeat layers, ending with cheese sauce. Sprinkle with remaining 1/4 cup cheese. Bake 45 minutes, or until squash is tender and top is browned. Let stand 10 minutes before serving.

creamy yum yum

Fresh out of the oven.
Work LUNCH close up!

This is a definite yes. Not at all a full meal unfortunately, but as a side dish, it is a solid yes. 

It makes me wish yet again I had a mandolin as it took way to long to slice all the squash. It could have used a little more bechamel sauce, but I like my sauce. 

Until the next side dish...


Tuesday, September 23, 2014

Ooopsy Rolls: only slightly

I found this recipe back when I was looking for alternative to bread. I decided it was time to give it a try and to see how they turn out.

Ooopsy Rolls
Ingredients: makes 6 rolls
cream cheese - 3 ounces
eggs - 3 large
cream of tartar - 1/8 teaspoon (or a dash)
MEthod:
Oven temperature: 300 degrees Fahrenheit
Separate the eggs and add the cream cheese to the egg yolks. A standard package of cream cheese is 8 ounces, so I eyeball what half of the package would be (4 ounces) and then cut off a little less to get 3 ounces. Mix the egg yolks and cream cheese until combined. 
In another bowl, beat the egg whites and dash of cream of tartar until they are stiff. Really stiff... as in, you can turn the bowl upside down and they won't move. The cream of tartar helps with this. 
Next, fold the egg yolk/cream cheese mixture into the egg whites until just combined. You want to stir as little as possible to keep the air you just worked so hard to create in the egg whites. 
Spoon the mixture onto a cookie sheet that is lined with parchment paper or has been lightly sprayed with cooking spray. 
Slightly flatten each mound with the back of your spoon.
Bake for 30-40 minutes in a 300 degree oven. When done, carefully remove with a spatula to a wire rack to cool. 
Consider adding about 1/8 teaspoon of dry mustard and a dash of salt for a savory dinner roll.
When it comes to tweaking the basic recipe, let your imagination run wild!

Whip it good.
Attack of the blobs!
They are like little souffles almost.
Meatloaf, Taters, and Ooopsey Roll
These were ok. They won't keep well, so next time I will only make up 1 egg worth. Be careful to not add too much cream of tartar. I don't care for the flavor and it was rather distracting in the side dish.I look forward to attempting different seasonings in them, but I am not too excited about making another batch anytime soon.

Until the next side dish...

Thursday, September 18, 2014

A Hope/Bock Tradition: Repeat Dinner

So my long time friend, hopeforbeer, came to visit a couple weeks ago and we have a little tradition called Repeat Dinner. It is a very decadent meal. 
We rotate the side dishes, but the main point of Repeat Dinner is Steak with Port Reduced Red Onions and Blue Cheese.  

A basic outline of how we make this traditional meal.

Caramelize the onions in butter and salt. Add some garlic if you want.

Cover with good quality port and allow to reduce to a sticky, yummy mess.
Remove onions from the pan, heat a bit of butter over hot and sear steaks. Normally they are Filet Mignons, but with the cost of food in general, we opted for New York Strip.
This time for a side, we seared Brussels Sprouts. I cut of the fatty piece of the steak
and reduced the fat to give the sprouts a really nice flavor.
After steaks are seared, combine blue cheese and bread crumbs and then place on top of meat
and put under the broiler for 30 seconds to a minute. Bread crumbs mellow out the flavor of the blue cheese a little.
While not the prettiest of Repeat Dinners, it was most certainly a yummy one!
The big trick is keeping the meat Medium rare. It makes the meal all the more decadent.


Wednesday, September 10, 2014

Addiction via Rice

I started cooking when I was young thanks to my Mother's example and my twin brother's desire to watch the Food Network. I found a website when I was in High School, after Maman passed away, that had several recipes I offered to make for dinner once so my Poppa Bear didn't tear his hair out trying to feed two picking and bereaved teenagers. Thanks's to Top Secret Recipes on the Web (I think it is only in book form now), I found a recipe for Benihana Fried Rice to which I added chicken and cooked the rice in half chicken stock and half water (you can easily leave out the Chicken and stock for the Vegetarians out there).

Benihana Fried Rice

Ingredients
1 tablespoon sunflower (or sesame or olive) oil
4 ounces boneless, skinless chicken breast, cut into 1-inch chunks (leave out for Vegetarian)
Salt, to taste
Pepper, to taste
2 tablespoon garlic butter -crushed garlic with butter, go with what feels right (Leave out for vegan)
3 eggs (Leave out for vegan)
1 cup onions, diced
1/4 cup carrots, diced
1/4 cup green onions, thinly sliced
2 cups cooked white rice (a day old is better, believe it or not, as you want it a little dry, I like to cook mine in equal parts water and chicken stock to get it extra flavorful)
2 tablespoons soy sauce
2 tablespoons sesame seeds (if you have them, if you don't no sweat)
Directions
Add the sunflower oil to a skillet and set over medium heat. Meanwhile, season the chicken with salt and pepper. Cook the chicken (stirring occasionally) until lightly-browned, firm, and opaque throughout. Add the garlic butter and stir to coat the chicken. Set aside.
Using the same pan, cook the onions, carrots and green onions until softened. Set aside.
Wipe out the pan, then scramble the eggs (season the raw egg with salt and pepper to taste). Add the rice, soy sauce, sesame seeds, chicken, onions, carrots and green onion to the pan and cook until the rice is warm and browned. Serve hot.


This is an easy dish as well as being one that is kinda perfect for the magic that are left overs. As usually, this dish fed my desire for Chinese and chicken. Granted, I could really use a trip to Benihana. I fed a couple friends this later in the day and they are thought it was solid as well. so WIN! Maybe while Auntie is in town or when Poppa Bear and Care Bear are around in the Fall.

Until the next meal...


Wednesday, September 3, 2014

Man cannot live on bread alone. He needs booze too.

Here we have something I haven't made much of before: BREAD. I wanted the simplest bread I could find. I didn't want to have to knead it, worry about it burning, etc. I mean I will bake more bread properly, I promise. Just let me do this my way this time. I mean my molasses soda bread was pretty yummy.

As my M.O. has been as of late, I pulled out my Crockpot to make this happen. Here is what I found on Instructables with photos and step by step by step instructions. It made me feel like I could really really do it.

No Knead Crockpot Bread 
Ingredients:
1/4 teaspoon Active Dry Yeast
1&1/2 teaspoons of Salt
1&1/2 cups warm water
3+ cups flour (all-purpose, unbleached natural white)
Method
Combine the ingredients in a large mixing bowl.
Start with the warm water, and add the yeast to it. Stir.
Add flour a cup at a time and mix. Add in the salt as you are doing this. Once you get in 3 cups of flour, keeping adding more flour in small amounts and mixing until the dough no longer sticks to the side of the mixing bowl. This might be an entire cup or more of flour.
Sprinkle a little flour over the top of the dough, then cover it with plastic wrap, and set out-of-the-way for 8 to 12 hours. I usually prepare the dough the night before I need it, and bake it the next day.
Dust your kitchen table with flour.
Dump the dough out onto it and roll around a bit. Shape the dough into a ball.
Line a bowl with parchment paper, and put the dough in it. Leave the dough for 2 hours to rise.
Plug in your Crock-Pot and set it to HIGH.
Allow it to preheat. The stoneware should get quite warm.
Once it's preheated, lift the dough by the parchment paper and transfer the dough and paper into the Crock-Pot.
Put the lid on.
Bake for 1 hour.
Check the loaf. The whole Crock-Pot should be somewhat steamy. Feel free to shake the hot water off the lid into your sink when you remove the lid to look inside. The loaf is baked as much by steaming as by direct heat, but you don't want the steam condensing, and getting the bread damp.
You will see that the top should be almost rubbery. It will NOT be crisp and brown.
Crock-Pots heat AT THE SIDES. You may notice nice color at the SIDES of the loaf if you pull it out, and that the bottom is par-baked but NOT browned or toasty.
Slow-cookers come in different power ratings. Yours may bake faster or slower than mine. Check your slow cooker every half-hour or so the first time you make this recipe, to get a sense of your slow-cooker.
Bake for another thirty minutes to an hour.
Bake time can be two to four hours total, depending on your Crock-Pot, its power, insulating the pot, etc. In this Instructable, think of times as only a general guide.
Now, flip the bread over.
WHAT!?!? Yep, you heard me right, flip it over. Because a Crock-Pot does NOT heat in the same way a typical oven does, the bread gets physically flipped upside down to bake evenly.
Only flip the bread after it's about three-quarters of the way baked. You've flipped pancakes, right? The trick with those is not to flip too soon. The same with Crock-Pot-Bread. Flip it after the top is set.
Bake another 30 or more minutes until baked.
Bread is finished when it sounds hollow when thumped and smells like bread.
Remove the bread from the pot and let cool.
Slice the bread with a serrated knife, electric carving knife, or old-school electric meat slicer.
You can store this bread in a plastic bag for no more than about three days. Without commercial preservatives, home-baked bread will either dry out or go moldy in just a few days. Fortunately, it always gets completely eaten right away, usually within minutes.


This turned out kinda blah. The texture was perfect as was the density. Maybe I forgot to add the salt completely because it was certainly lacking the zing and pizaz I was hoping to taste. If I make it again, I would add either more salt and or molasses.

Whelp...Until the next loaf...

**Today's title comes from Theodore P Stein...no, I don't know why he is important. I will Wikipedia it for you though...yup, still nothing. Meh, I still like the quote, so I will leave it.** 

Friday, August 8, 2014

Vegetarian Ratatouille thanks to what was in my fridge.

Okay, so no, this is perfect ratatouille. It was acceptable for my diet and I already had these things thanks to what I had already made for the week.

(what we had in the fridge) Ratatouille
Ingredients
2 yellow squash, sliced
2 zucchini squash, sliced
1 onion, yellow, sliced
1 can of tomato sauce
salt, pepper, oregano, basil, and thyme
Mozzarella and Parmesan, grated (leave off for vegan or use sub)
Method
Arrange squashes and onion in festive manner within a deep baking pan.
Mix spices into tomato sauce until fragrant (let's say a teaspoon each, or to taste)
Pour tomato sauce over veggies and sprinkle grated cheese over all.
Bake at 375 for 40 minutes.

The squash is not too squishy!
This isn't the best or even a great recipe, but it did the trick for a vegetarian dinner for the week. For the animal lovers out there, adding some chicken to the dish would be simple and satiating.

Not super pretty, but quite yummy.

Until the next vegetarian meal...

Thursday, July 31, 2014

Comfort in a cup

Maybe it is just me, but macaroni and cheese the best comfort food. I also really like the trend in food (and Pinterest) to make small portion things to eat. Thus, I decided to make single serving Mac and Cheese Cups. I found a very good recipe here. I selected it mainly because, it had broccoli in it which makes it healthy.....right?

Mac and Cheese Broccoli Cups

Ingredients
8 ounces (2 cups) elbow pasta
2 cups shredded mozzarella cheese
2 large eggs
1 cup 1% milk
¼ cup cream cheese
1 ½ cups broccoli florets, cooked and chopped
3 tablespoons chopped onion
1 tablespoon Dijon mustard
½ teaspoon sea salt
1 teaspoon black pepper
1 teaspoon italian seasoning
1 teaspoon garlic powder
Topping
2 tablespoons unsalted butter, melted
1 cup Japanese panko bread crumbs
2 tablespoons parmesan cheese, grated
Instructions
Preheat oven to 375 degrees F.
Cook macaroni according to package instructions in a salted pot of boiling water, undercooking slightly (al dente),
Drain the pasta and in a large bowl with cream cheese and mozzarella cheese stir until cheese is gooey and melted.
Crack the two eggs into a separate bowl, scrambling them slightly, then adding it to the pasta cheese mixture. Add the milk and stir.
Add seasoning of salt, pepper, garlic powder and onion and italian seasoning and continue to mix.
Add Dijon mustard and broccoli.
Divide the mixture among 15 cups of a greased muffin tin (I used one 12 and 3 from the other tin). Stuff into the cups, about ¼ cup each.
Topping
In a small bowl, stir together butter, bread crumbs and parmesan cheese. Don't clump but instead mix until it is like lumpy sand. Sprinkle evenly over the macaroni. Divide bread crumb mixture among macaroni cups, pressing into the cups.

Cook for 20 minutes. Allow to cool for 5 minutes and remove from tins. Enjoy! Let cool for at least five minutes before unmolding.


These turned out very yummy! I made a few changes to the recipe: I used crush pita chips for the panko and I used 1 cup Cheddar and 1 cup Mozzarella. The original recipe called for cream cheese and all mozzarella.

There was a unanimous agreement that it needed more creaminess. So I should have used the cream cheese. The only reason I didn't was because I totally forgot it and didn't want to go to the store for just that. We also agreed that it could use a bit of Serrano to jazz it up a bit or maybe just some slice tomato. Lots of experimentation to come.


Until the next party food...


Wednesday, July 16, 2014

I'm sorry I messed up your barbeque.

Best part of summer.....? Barbeques!! 

Specifically, corn. I love corn. No nutritional value, but so much delicious. 

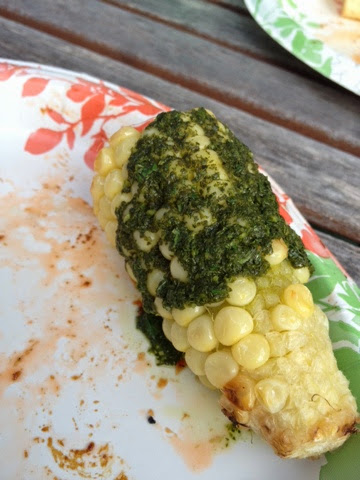
Roasted Corn with Cilantro Lime Pesto!
Ingrediants:

  • Corn on the Cob
  • 1/2 Cup Cilantro leaves, large stems removed
  • 2 Tbsp fresh squeezed lime juice
  • Garlic clove chopped finely
  • 1 tsp. Kosher salt
  • 1 tsp. Black pepper
  • 1/4 Cup Vegetable oil
  • 1/4 Cup Olive oil
  • 1/4 Cup Butter (leave out for vegan)

Instructions

  1. 1. Peel back the husks of the corn, keeping them attached. Remove the silk, then fold the husks back over the corn. Soak the corn in cold water for 10 minutes. 2. Preheat one grate of a well-oiled charcoal or gas grill to medium-high and another to high. 3. Place the cilantro, lime juice, garlic, salt, and pepper in a food processor or in a blender and blend. With the machine running, slowly drizzle in the oils. Set aside. 4. Place the corn, still covered by the husk, on the medium-high grate. Cook for 3 minutes, then turn to the other side, and cook for 3 minutes. Remove from the grill, peel back the husk, return to the high grate to cook the corn on all sides, turning as need for 5 to 7 minutes. Allow corn to cool a little, then rub a little butter on each, and finally, spread the pesto over just before serving.


I loved this! I think it could have used another clove of garlic, and maybe have it roasted a bit instead of just raw.

Until the next cookout...


**Today's title comes from The Simpsons: Lisa: I still stand by my beliefs. But I can't defend what I did. I'm sorry I messed up your barbeque.
Homer: I understand honey. I used to believe in things when I was a kid.**

Wednesday, July 9, 2014

A cat has nine lives, as the onion seven skins.

What to do if you are eating low carb over the BBQ weekend of America? Make the yummiest veggie skewers you can think of, obviously!

Vegetables:
Green bell pepper
Yellow squash
Zucchini
Red onion
Mushrooms

Brush on marinade:
Olive oil
Balsamic Vinegar
Garlic
Thyme
Basil

Grill till lightly charded!


We met friends at a park near our home and Dustin made AMAZING oozy discharge burgers as I like think about them. The meat patty is formed around a slice of cheese. It looked tasty. I mean look at it:


The skewers were very yummy and turned out nicely. There were many left over which I stir fried with chicken and General Tso's sauce PLUS do garlic pepper sauce I got from my Bro Bro Tsumi from Japan!

Until the next cookout...


**Today's title is a German saying: A cat has nine lives, as the onion seven skins.**


Tuesday, June 17, 2014

I've read hundreds of cookbooks.

I have made many many things with biscuits a la Pillsbury Grands. While they are easy and a delight to open, I kept thinking to myself, I can make these. I don't need to keep buying these. Just imagine how many preservatives are in these things. Why can't I just buckle down and use Grandma Jones's Biscuit Recipe? Why am I just a lazy bum who can't do something for yourself?

Sorry, I can get a bit negative when I know I have done something MONTHS ago. Tsk Tsk, Cat.

So I finally did it I made the freezer biscuits!

Homemade Freezer Biscuits
4 cups flour
2 Tablespoons baking powder
1 teaspoon salt
1 cup shortening, butter, or partial coconut oil 
1 3/4 cup milk
Mix dry ingredients together. Add in the shortening or butter and mix until crumbly.
Add in the milk and mix until a ball forms.
Roll out onto a floured surface and cut into biscuits.
To Freeze: Freeze on a cookie sheet for 1-2 hours. Then remove and place in a airtight freezer bag.
To Bake: Pull the desired number of biscuits out and let thaw for 30 minutes to an hour. Bake at 450 degrees for 8-12 minutes. You can bake them straight from the freezer but they won’t rise much.

This goes into 


Gotta cut them biscuits!

Biscuit Pizza Crusts!!


Pizza to be Frozen and then
defrosted and cooked as needed!


Ta Dah! Biscuit!!


These aren't QUITE as tasty as the preservativeful and butterful Pillsbury Grands, but they most certainly do the trick.Not that these (with the shortening) aren't full of preservatives, but since it is the same sort of preservatives I put into my cookies, I don't feel too bad about it all.

These were a bit smaller than Grands, so instead of 2, Husband need 3 to feel full for dinner. It doesn't seem to upset him, just a little more work than what was planned it all.

Until the next meal...


**Today's title is from Colonel Sanders: I've read hundreds of cookbooks. Most of those cookbooks don't even tell you how to get a steak read, how to bake biscuits or a pie.**